Showing posts with label Kylie's Demo Training Blog Hop. Show all posts

Sep 14, 2020

Kylie's Demo Training Blog September 2020 - Festive Post Three Ways


Thank you for joining us for our Stampin' Up!® Demonstrator Monthly Team Blog Hop! I really hope you check out all our posts and get inspiration from these amazing demonstrators to create your own projects.

I’m Ginny Duncan from Maple Ridge, BC Canada and I’m so happy you stopped by today! Check out my projects today and then head to the link list at the bottom of this page so that you can see every blog post and idea.

I cased my card ideas from the card above on p 11 in the August - December 2020 Mini for a team challenge, and realized it was a great design to show off the different seasons in the Festive Post Stamp Set and the Plaid Tidings 6" x 6" Designer Paper Pack. All the focal greetings or images can be punched with the Rectangular Postage Punch in the Annual Catalogue so "win win" for me!! The Plaid Tidings DSP has an awesome variety of designs for any occasion  too!

Do you like making Halloween cards?? They are so much fun to make, but sadly our grandkids are getting older so it won't be long before I have no one special to make cards for, and send treats to help them celebrate . . . 

Christmas is definitely coming (a little over three months away!) and it's never too soon to start making cards to share with family and friends - so important to put a card in the mail especially if we aren't able to be with them in person this year. We really don't know where this pandemic will take us by December so connecting with cards is one way to be sure we stay in touch.  This card features the Red Velvet Paper Pack too embossed with the Greenery Embossing Folder.

In the New Year we will be thinking ahead to Valentines Day so this set comes to the rescue with a pretty card idea that I took from the boxed treat on p 63 and made it into a card!
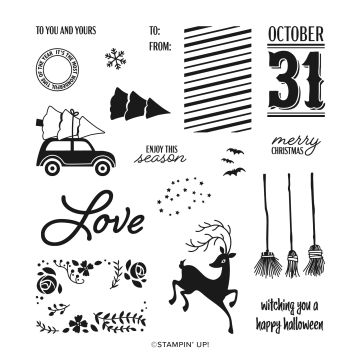
STAMP SET PHOTOPOLYMER FESTIVE POST

Are you ready to shop and put this set on your list? Then head over to my online store and get started! 

Thank you so much for visiting today! I've had an awesome time being part of this years training program and blog hops with Stampin' Up!® demonstrators from around the world, and I so appreciate all your comments as I shared my projects with you. Sign up for my newsletter while you visit and see what's new in my stamping world each month! 

Happy stamping!!

BLOG HOP LIST

Aug 10, 2020

Kylie's Demo Training Blog Hop August 2020 - Posted For You Bundle


Thank you for joining us for our Stampin' Up!® Demonstrator Monthly Team Blog Hop! I really hope you check out all our posts and get inspiration from these amazing demonstrators to create your own projects.

I’m Ginny Duncan from Maple Ridge, BC Canada and I’m so happy you stopped by today! You may be starting here  or have come from another blog - either way you can find the link list at the bottom of this post so that you can see every blog post and idea.

It's still summer on the West Coast where I live, so I decided to show you a bundle from the Annual Catalogue that I recently featured in our Stampin' Up! Canada Newsletter for demonstrators.  I’ve always loved stamps with postage themes – as a young girl I collected stamps so maybe that’s why I had to get the Posted For You Bundle on p 81! Postage stamps make me think of travel and faraway places – so the nostalgia theme in this set is perfect for cards and layouts. The script on the greetings is an ideal match for the stamps – you will have fun making cards and travel layouts too with this bundle! Click here to purchase now or add to your wish list!

There are a few techniques to make the card on the page so grab your favourite beverage while you follow along! 

To mask the birds, I put some tape over the lower half of the image, inked the image (I used Memento Tuxedo Black Ink on my stamping), removed the tape and checked I had the details I wanted, then stamped. The other altered image was the “Love” one where the concept artists only inked up the flower  - I used my Stampin’ Write Black Marker to ink those details, then huffed and stamped. I stamped the other images on Whisper White scraps until I had all five done. I then punched each one with the Rectangular Postage Punch – super easy! To modify three of the punched images to be smaller – I carefully slid the punched piece back into the underside of the punch opening until it was the desired length then punched again for the new size. 

I used my Sponge Daubers and Cherry Cobbler, Old Olive, Seaside Spray and Bumblebee inks to add some subtle colours to the postage stamp shapes. Quick and no mess! I added a bit of colour to the inside stamp and I stamped the envelope

My card base is Old Olive Cardstock 8 ½” x 5 ½”, scored at 4 ¼”. The Ornate Garden DSP was cut to 4” x 5 ¼” and the finished postage stamp pieces were added directly to this piece – looked a bit like a puzzle! I adhered a 4” piece of the Open Weave Ribbon from Forever Greenery Trim pack with Tear & Tape across the middle of the pieces.   

I stamped the greeting in Memento Black on a strip of Bumblebee Cardstock (1/2” x 3”) and popped with Dimensionals over the Open Weave Ribbon. I wrapped about 30” of the Gold Trim (from the same pack) around twice and tied in a bow. The last step was adding some clear Flowers For Every Season Gems. Attach the DSP layer to your card base with Dimensionals and it’s done!

Did you know that this punch works perfectly with the Festive Post Stamp set in the new Mini Catalogue?? I LOVE it when we can use our tools with more than one set!! 


Which stamps are you buying to go with this punch?? Click here to get your Festive Post stamps now or add to your wish list! Maybe like me, you can soon say "All of them"!! 😄

Thank you so much for visiting today! We have an awesome group  of Stampin' Up!® demonstrators from around the world, and we know you are going to love all their projects as you go through all the links. 

Remember you are currently on my page – Ginny Duncan and I appreciate all your comments!  See who is below my name to know where to go next.

BLOG HOP LIST


Jul 13, 2020

Kylie's Demo Training Blog Hop July 2020 - Field of Flowers Bundle


Thank you for joining us for our Stampin' Up!® Demonstrator Monthly Team Blog Hop! I really hope you check out all our posts and get inspiration from these amazing demonstrators to create your own projects.

I’m Ginny Duncan from Maple Ridge, BC Canada and I’m hoping you are sitting with a cuppa' to enjoy all the creativity today!! You may be starting here  or have come from another blog - either way you can find the link list at the bottom of this page so that you can see every blog post and idea.
I love flipping the pages in our new catalogues when they first arrive - and marking the ones I think I might want through the coming year. It's so tempting to want it all, but when I sit down to buy, and reality kicks in, then I really try to get what I will use lots of times and for lots of occasions!! 
The fresh look of the concept designers ideas for the Field of Flowers Bundle on p 117 caught my eye and the fact it had a coordinating punch made it super easy to put on my order!!  And the fonts in the set? I LOVED them ALL!! 
Keeping in mind that there are lots of new stampers, as well as experienced ones in my world, I wanted to share cards that everyone can make whether they have to do one quickly or have lots of time to play with layers. I used the same ink colours on each card - Poppy Parade, Mango Melody, Granny Apple Green and Coastal Cabana - adding Basic Black cardstock and Memento ink to the second and third stepped up versions.
My first card is pretty basic stamping to fit on one of our Note Cards so it comes together fast when you are rushed. I stamped the grass on a 2 3/4" x 4 1/4" layer of Whisper White, then stamped the dragonflies and greeting. A quick run through my Subtle 3D Embossing Folder added texture but can easily be left off. I stamped the flowers in two colours on Whisper White strips and punched them out, then added to the stamped layer. A little Linen Thread around the layer and it was ready to add to our Note Card base. 
The next card has a hint of the grass at the bottom, but the flowers take centre stage - I stamped all the images on Whisper White again (3" x 4 1/4") and ran it through the Subtle 3D Embossing Folder. I added a couple of extra flowers that were fussy cut from scraps of Whisper White and cut around the greeting shape to add to the stamped layer. Then it was added to Basic Black (3 1/2" x 4 3/4") and popped onto a Whisper White card base. A couple of Basic Rhinestone Gems add sparkle.
I did the Spotlight Technique on my final card to show off the pretty flowers and add some layers for those that have more time to play with their projects. The Basic Black Scalloped Circle was die cut from the centre of the Basic Black cardstock layer behind my stamping piece! No waste!!😊 All my envelopes have the small dragonfly image in the corner - so quick and cute!!

Here's a link to the Field of Flowers Bundle - I can't wait to see what you create with this set!  Thanks for stopping by today and enjoy hopping through all the participants . . . I know you are going to love all the projects. 

Stay safe and keep in touch with family and friends by making cards and sending them - they will love your happy mail!! 

Remember you are currently on my page – Ginny Duncan and I appreciate your comments!  Sign up for my newsletter to know what's happening in my stamping world!! See who is below my name to know where to go next.

BLOG HOP LIST


Jun 15, 2020

Kylie's Demo Training Blog Hop June 2020 - Ornate Gardens Suite is Amazing!!

Welcome to our Stampin' Up!® Demonstrator Monthly Team Blog Hop! I really hope you check out all our posts and get inspiration from these amazing demonstrators to create your own projects.

I’m Ginny Duncan from Maple Ridge, BC Canada and I hope you are enjoying all the creativity you've seen so far! You may be starting here  or have come from another blog - either way you can find the link list at the bottom of this post so that you can see every blog post and idea.
I have not paid nearly enough attention to the Ornate Garden Suite of products starting on p 64 in our new Annual Catalogue. You may recall that this suite was a bit of a teaser for us to purchase ahead of  the release of the full catalogue on June 3rd. If you have any part of this suite, I hope I inspire you - and if not then what are you waiting for?? Click on my links below the card ideas and you'll go straight to my website where you can purchase any (or all) of these amazing products!! And believe me, you ARE going to want it all!!
This card was one I did for a group tutorial - the tutorial will be my gift to you with your $75 or more purchase of any of the bundles and coordinating products in the suites, and you will have so much inspiration to create lots of cards and more! There are 90 projects in the tutorial bundle - wow!!
The Specialty Designer Series Papers are beautiful - lots of gold foil touches for a truly elegant look to your projects. I used them on some of my projects to highlight how well they work together or separately - you will love the results no matter which ones you choose!! 
Did you notice my bits of vellum on my first two cards? Love how that simple addition adds some softness to the designs . . .  and I added the Gilded Gems in a couple of places too for some extra bling :-) I am in awe of the number of sayings included in the Ornate Thanks stamp set - it has something for every occasion for both the front and the inside of your cards!

Here's a link directly to the suite of products on my website - let me know if I can help you decide which items to purchase now, and which ones are for next time!! Why not just get it all, have it sent to your home and soon you'll be creating awesome projects like the ones I'm showing you in this post, and the ones showcased in the catalogue too! 

Thank you so much for visiting today! I hope you are staying healthy and following the guidelines in your community so we can get through this pandemic and once again enjoy crafting together in person. Meanwhile stay tuned for more online events . . . .  Facebook Live and Zoom coming your way!! 

We have an awesome group  of Stampin' Up!® demonstrators from around the world, and we know you are going to love all their projects. Grab a cuppa and go through all the links. 

Remember you are currently on my page – Ginny Duncan, and I appreciate all your comments!  See who is below my name to know where to go next.

BLOG HOP LIST

May 11, 2020

Kylie's Demo Training Blog Hop May 2020 - Sketches for the Win!!

Thank you for joining us for our Stampin' Up!® Demonstrator Monthly Team Blog Hop! I really hope you check out all our posts and get inspiration from these amazing demonstrators to create your own projects.

I’m Ginny Duncan from Maple Ridge, BC Canada and I’m so happy you stopped by today! You may be starting here  or have come from another blog - either way you can find the link list at the bottom of this post so that you can see every blog post and idea.
I've chatted (from a distance!!) with a few friends lately who say they feel like they are losing their creativity with staying indoors and not getting the stimulation from being out and about  and visiting with friends and family. . . . and wonder what they can do to keep creating. My answer always is: Check out some sketches (yes, you can google it!)

Sketches are a great way to get your imagination going again, even if you start out copying exactly, before you know it, you are off with your own interpretation of the design and just like that you are back in your happy place!
Here's a card I did for today's blog hop based on a team sketch challenge last week.  It's pretty much the way the sketch was drawn, with the variety of layers and the portrait orientation.  I do love the Birthday Bonanza Designer Series Papers and the Bonanza Buddies Bundle which is retiring June 2nd! What you say?  Yup, better get it now before it's gone!! This bundle makes the cutest cards for both the big and little kids in your life!!
This card shows how I took the sketch and made it into a pretty and girly card using the Parisian Blossoms DSP and the Parisian Beauty Bundle . . . . do you have travel pictures you need to scrapbook?? Then this bundle is the perfect one to remind you of vacation times to faraway places . . and because it too is retiring you need to get it while you can.
The third card gives you an idea as to what can happen when you turn a sketch on it's side (you can even turn them upside down!) and take the elements and play with them just a bit . . . can you see your imagination starting to take off by now?? I used the retiring Garden Lane DSP along with the Magnolia Blooms stamps from the Experience Creativity Brochure and added some Metallic Pearls. That stamp set is like a baby sister to the Good Morning Magnolia stamps (and dies) in the Annual Catalogue - check them all out!!

All the retiring products are listed in the Last Chance section of my online store so get your shopping started now so you don't miss out.
And while you are there, why not click on the Giveback picture and download the special COVID-19 sentiments so you can Share Sunshine by sending off tons of cards to your family, friends, and neighbours to keep in touch! The sentiments are also great for making cards and giving them to essential service workers when you are out getting your groceries and other necessities.
Thank you so much for visiting today! We have an awesome group  of Stampin' Up!® demonstrators from around the world, and we know you are going to love all their projects. Grab a cup of your favourite beverage and go through all the links.

Remember you are currently on my page – Ginny Duncan and I appreciate all your comments!  See who is below my name to know where to go next.

BLOG HOP LIST

Apr 13, 2020

Kylie's Demo Training Blog Hop April 2020 - Making Magic With Vellum


Thank you for joining us for our Stampin' Up!® Demonstrator Monthly Team Blog Hop! I really hope you check out all our posts and get inspiration from these amazing demonstrators to create your own projects.

I’m Ginny Duncan from Maple Ridge, BC Canada and I’m so happy you stopped by today! Our world has certainly changed since we last hopped together but one thing hasn't changed and that is our desire to reach out to each of you and share our creativity and hopefully inspire you to share some love in your family or neighbourhood by making projects or cards and mailing them or dropping them off at someone's door. We are all staying at home unless we have to go out then the rule is "social distancing" and trying to keep us all safe.

Today I'm sharing some ways to use that package of Vellum Cardstock you have and might be wondering (like some of my crafters) why did I buy that?? 

Vellum is perfect to add so much texture to a card or layout without adding a ton of bulk or weight so ideal to mail, or to incorporate into your layout pages. 
My first sample above uses Vellum in an easy way - pick a favourite die and use it to give you a subtle but fun background for your greeting on a card. I used the swirl from the Painted Labels Dies to create this background - and it doesn't compete or take away from that gorgeous Peaceful Poppies Designer Series Paper. 
The picture above shows you how to add some adhesive to Vellum so it won't show - grab your Silicone Mat, a couple of dabs of Multipurpose Liquid Adhesive and a piece of Stampin' Sponge. Wipe it across your cardstock where you want your vellum pieces to stick and presto it's done! Use the sponge to add adhesive to the back of intricately cut die pieces for a no mess solution. And for the inside of the card, I added a Vellum layer scored in half, and attached a greeting layer using the same adhesive trick. The inside greeting says "thinking of you with all my heart" from the Mini Catalogue's Peaceful Moments Stamp set.
This picture shows the finished card and the Whisper White Crinkled Seam Binding holds the inside Vellum layer in place - no adhesive required! I coloured the outline of the die cut poppy (on the back) with my Dark Poppy Parade Stampin' Blends. I did add a few Vellum pieces from the Peaceful Poppy Elements to the card as well as the die cuts from the Poppy Moments Dies.
This card really shows what running Vellum through one of your embossing folders can do - this was the Scripty 3D embossing folder and it sure makes an impact on the card front and tones down the pattern on the DSP at the same time. What do you think of the effect? 
My final card today shows how you can dress up a Basic Black Cardstock frame with Vellum run through the Subtle 3D Embossing Folder and create a really different element to your card layer - I think whoever gets this card will really know that I'm wanting to help them celebrate their special day! I used the Whisper White Craft Ink for the greeting and some of the Peaceful Poppies Sequins for the bling. I was super happy with the end result :-)

Want to make these projects yourself?? If you are in Canada I would be happy to have you shop with me (click on this link or message me). Please use my current Host Code (for April it is 46KJVTAQ ) so I can send my thank-you at the end of the month.

I'm ending my post today with the words of our Provincial Health Office Dr. Bonnie Henry, who closes off each daily update to us with the following message which really resonates with me and many others -
Be kind. Be calm. Stay safe.

Thanks for taking the time to visit and read my post today - virtual hugs to each of you!

Ginny Duncan, Maple Ridge BC Canada

BLOG HOP LIST


Mar 16, 2020

Kylie's Demo Training Blog Hop March 2020 - See a Silhouette Designer Series Papers

Thank you for joining us for our Stampin' Up!® Demonstrator Monthly Team Blog Hop! I really hope you check out all our posts and get inspired to create your own projects.

I’m Ginny Duncan from Maple Ridge, BC Canada and I’m so happy you stopped by today! You may be starting here  or have come from another blog - either way you can find the link list at the bottom of this post so that you can see every blog post and idea.
It's not often that I feature a series of our DSP instead of stamps, dies or punches but this paper has been one I've reached for so many times lately, that I have to share how it makes some awesome cards for any occasion! The picture above shows some of the concept artists' creations - below is the paper in all it's wonderful colours!
I'm always checking my Designer Series Papers to see what I can use for my classes at a seniors residence where I go each month and take kits for them to make their cards. I've paired each card idea with stamps and sometimes embellishments from the Spring Mini so everyone has a chance to see what's new too. Can you tell they like to have birthday cards on hand??


The See a Silhouette papers are perfect for bright and cheerful birthday cards and they coordinate with so many different cardstock colours that everyone will be happy with their creations! Here's the list of coordinating colours: Blackberry Bliss, Crushed Curry, Daffodil Delight, Flirty Flamingo, Mango Melody, Mossy Meadow, Night of Navy, Old Olive, Pacific Point, Poppy Parade, Pumpkin Pie, Real Red, Rich Razzleberry and Whisper White (Wow!)
I recently worked on a fundraiser that my friend Pam organized and the card above is one of the samples I made for our participants to choose from - they stamped all the images on their chosen pre-cut kits and finished them with their adhesives. I trimmed a piece off the Pacific Point Cardstock Base and used it under the birthday greeting as a banner. I also trimmed 1/2" off the right side of the DSP for the right side of the card base. It was a fun day for all!

Here's a couple of card sample ideas that Pam shared - since the fundraiser was to benefit our furry friends, she had to include a couple of card kits honouring them! Aren't they fun??  I added the little paw prints inside the puppy one - so cute!
Remember that our Annual Catalogue has so much to offer and it's worth going back to basics when some of the more trendy bundles are on back order or not available - I still want to make cards and hold my classes - and I know my customers do too! Aren't these colours amazing??
I'm saving a couple of patterns for a scrapbook layout that I'm working out in my mind . . . .  what are you doing with your DSP that you have on your shelf?? We will have lots of time to create these days with travel outside our country being discouraged so I'm looking forward to making some of my DSP products take centre stage in my craft room!!

Need some card making supplies? Head over to my online store and start shopping with your list - message me if you need help getting started . . . . and while you are there why not RSVP for one of my Coffee and Cards events next week? It's a great way to get new ideas for making cards, plus you will go home with some for your box - it's a happy feeling when you know you are ready with a card for the next occasion :-)

Grab a cup of your favourite beverage and go through all the links in our current hop. Thanks so much for visiting me today - I appreciate all your comments so let me know what you think!  See who is below my name to know where to go next.

Happy stamping!

BLOG HOP LIST


Feb 10, 2020

Kylie's Demo Training Blog Hop February 2020 - Peaceful Poppies Suite


Thank you for joining us for our Stampin' Up!® Demonstrator Monthly Team Blog Hop! We are so happy that you could join us today as we share ideas and creative inspiration. We are a group of Stampin' Up!® Demonstrators from around the world taking part in training to reach some goals we have set. We really appreciate your support.

I'm Ginny Duncan from Maple Ridge, BC Canada. You may be starting here or have come from another blog - either way you can find the link list at the bottom of this post so that you can see every idea that we are sharing today.
I was drawn to the Peaceful Poppies Suite from the moment I saw the Mini Catalogue cover at On Stage - I have always loved poppies - partly for the symbolism they represent as a reminder of our war veterans' sacrifices but also because they are such a vibrant flower in our gardens. And they can be so many colours! 
Today's picture shares with you the cards we did in my special Painted Poppies class - and the optional scrapbook layout that some of my participants chose to do. Don't you love how the cards are so many different colours? My class participants were in awe of the Peaceful Poppies Designer Series papers we used, and were super happy to take some home to create more cards! The border print was perfect for the layout I chose to do with some of them - and they still have the other half sheet to make cards or feature on another layout page. 
 
I showed a coordinating grid page for the focal layout as most of us like doing double page layouts in our scrapbooks - do you like double pages too or do you mostly do single pages?? 
I love being able to add in some of the coordinating products like the Peaceful Poppies Elements and Sequins to make the layouts special and I always try to have a bit of ribbon somewhere in my layouts. If you check out the cards, you will see I added some of the same Elements and Sequins, and ribbon to the cards we made . . . it was a really fun class to put on for everyone!
If you want to make your own cards or scrapbook pages, here is the link to the products we used and you can get your order started now, or contact me to place your order - but going direct is quicker and it will go right to your home!! 

Thank you so much for visiting today! We have an awesome group  of Stampin' Up!® demonstrators from around the world, and I know you are going to love all their projects. Grab a cup of your favourite beverage and go through all the links. Remember you are currently on my page – Ginny Duncan and I appreciate all your comments!  See who is below my name to know where to go for your next inspiration.


BLOG HOP LIST