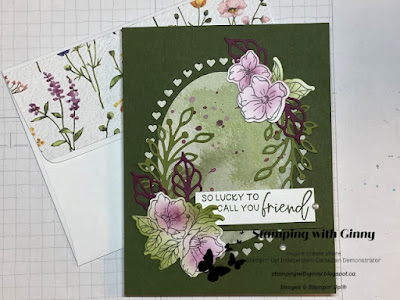
It's time for another Sunday Share and today I'm giving you another sketch to add to your inspiration board. It's an easy one and the centre oval can be any shape you want - it does not have to be the pictured design - sketches are meant to inspire you, not to follow exactly (unless you want to LOL!)
I had two ideas in mind when I drew this sketch for a Facebook page I'm on and I'm sharing both of my cards with you here so grab your cuppa' and read along with me . . . .
I love the effect I got from using one of the Framed Florets Dies (p 65) on the Mossy Meadow layer for my card front - the little hearts in the oval frame are so cute (and if you want to save them for a shaker card there are lots!).
The die cut flowers and leaves are stamped from the coordinating Framed Florets stamp set in the bundle and did you notice that Stampin' Up! has started to name the stamps and dies the same with this new catalogue?? Easy to remember now which stamps and dies go together!!
The waterclour wash background behind the oval is one of the backside designs in the Sale-a-bration Dainty Flowers Designer Series Paper pack (p 6 in SAB flyer) that you can choose as a FREE Gift with each qualifying purchase. It makes pretty cardmaking so easy!!
My second card takes full advantage of one of the floral patterns in the Dainty Flowers DSP - I cut the strip of ovals off the full sheet and then cut one down to 3 7/8" x 4 3/4" before matting on Crushed Curry and Garden Green cardstock layers. I got my colour choices from the list that Stampin' Up! provides on each pack of DSP - it's always there for you to check!
How perfect is this greeting (stamped in Garden Green ink) for that someone special that you are sending this card to? All you need to add inside is your happy birthday wishes and you are ready to send!
The new Adhesive-Backed Milky Dots (p 31) really pick up the colours on the background and are the perfect add to finish off my card . . . I added a strip of the DSP to my envelope flap too! Can you see the textured look that is right in the design? So cool!
Ready to shop now? Click here to go to my online store anytime and use my current Host Code 97AVUSCC (if your order is under $200) so I can track your orders and enter you in my monthly draws for shared Host Rewards. And I send you my thank you treats in the mail too!
Watch for my newsletter later this week where I share another sketch for you to use!
Happy stamping!
Ginny


No comments:
Post a Comment
I love when you leave a comment on this post or my blog - thanks for reading!!